System requirements.
JDK1.5 or 1.6, Maven2, SpringSource Tools Suite and internet connection.
1. Download and Install JDK (1.5 or 1.6.x), set JAVA_HOME variable in system.
2. Download and Install Maven2.x and set installed location to a system variable (M2_HOME)
a. Create a system variable (MAVEN_OPTS) with the following value.
-Xmx1024m -XX:MaxPermSize=192m
3. Download & Install SpringSource Tool Suite (STS) from SpringSource site (http://www.springsource.com/developer/sts). You may have to register to download it.
4. Download and Install following extensions for STS. Navigate to 'Dashboard' from 'Help' menu. Select 'Extensions' tab. Select the below 2 extensions and click on "Install" button. Configure proxy in IDE if required.
a. "Grails (Current Production Release)"
b. "Grails Support" under Language and Framework Tooling' header
5. Restart the STS IDE when requested to do so.
6. Set 'Grails' installed directory (ex.C:\springsource\grails-1.3.6) to a system variable (GRAILS_HOME)
7. Select 'Grails' perspective in IDE.
8. Open 'atchetype-catalog.xml', available in User home (Ex. C:\Documents and Settings\USER1\.m2), add following lines between archetypes elements. If file does not exist create one.
<archetypes>
<archetype>
<groupId>org.grails</groupId>
<artifactId>grails-maven-archetype</artifactId>
<version>1.3.6</version>
<description>archetype-grails-1.3.6-webapp</description>
</archetype>
</archetypes>
Assuming the settings.xml (maven configuration information) is also available in same (C:\Documents and Settings\USER1\.m2) directory and configured with intranet/local or internet maven repositories.
9. Create a new Maven Project using the above archetype.
a. select File ->New --> Other from menubar.
b. type/search for Maven in input box (refer below image) and select "Maven Project"
c. Click 'Next' button to select 'grails-maven-archetype'. If not found then see if your machine is configured to connect a maven respository and download the 'grails-maven-archetype' plugin.
You may have to restart IDE.
d. Click 'Next' to enter maven coordinates for your sample (MyFirstGrailsProj) grails project.
e. Hit 'Finish' button. The IDE takes a few minutes to create a project with Grails environment. Please observe the outpont 'Maven Console' from 'Console' view.
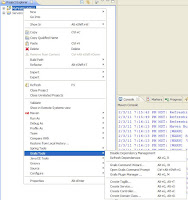
10. Apply 'Grails nature or capabilities' to 'MyFirstGrailsProj'
IDE takes a few minutes to apply the Grails/Groovy behavior/settings to project. Observe output on Console tab/window.
11. Verify if Step 10 is successful. Please refer to below images.
12. Clean the project.
Select 'Clean' from 'Project' in Menubar
12. Select 'Run As' -> 'maven clean' from context menu of project. Observe 'BUILD SUCCESSFUL' in output of 'Maven Console' and 'Console' windows.
Please fix errors if there are any.
13. Select 'Run As' -> 'maven install' from context menu of project. Observe 'BUILD SUCCESSFUL' in output of 'Maven Console' and 'Console' windows.
Please fix errors if there are any.
14. 'Refresh' project once in a while, as sometimes IDE does not get synced with File System.
15. Run commands of Grails on project by either using menu options or keyboard.
a. Using Menu option.
b. Select the project hit ALT + CTRL+ SHIFT + G keys to see a small popup window then type required Grails command (runapp) and hit Enter key.
Please observe the following output in Cosole window.
Server running. Browse to http://localhost:8080/MyFirstGrailsProj
Clicking on the link will display a home page of deployed application..


No comments:
Post a Comment