Thursday, August 7, 2014


Grails in Websphere - Not loading/working static resources in cluster env.

Problem:
It is observed that the Grails application was working fine in local (tomcat) developer box and not behaving the same when deployed into Websphere cluster.

Solution:
If you are using grails resources plugins then use the plugins in the following order.
        // Manually update the resoures plugin to resolove websphere look up errors
        runtime ":resources:1.2"
        runtime ":cached-resources:1.0"
        //runtime ":zipped-resources:1.0"
        compile ":cache-headers:1.1.5"


Friday, July 18, 2014

Proxy Settings for Grails application


If you happen to work on more than one Grails application then it makes more sense to configure the HTTP Proxy settings in one place than in BuildConfig.groovy of each Grails project.

The following steps are for Windows7 env.
1. Create 'ProxySettings.groovy' file in C:\Users\USERID\.grails directory.
2. Add the following entries to it.

client=['http.proxyHost':'PROXY URL', 'http.proxyPort':'8080', 
        'http.proxyUser':'DOMAIN\\USERID',         
        'http.proxyPassword':'PASSWORD',             
        'http.nonProxyHosts':'IF ANY' ] 

currentProxy='client'   

Reboot/Restarting of the machine is required to affect the changes.


Additional Settings to check-in/release Grails applications/plugins into your corporate/private SVN repository and Maven repositories.
1. Create 'ettings.groovy' file in C:\Users\USERID\.grails directory.
2. Add the following entries to it.

grails.project.repos."REPO_NAME_IN_NEXUS".url="FULL_URL_OF_REPO" 
grails.project.repos."REPO_NAME_IN_NEXUS".type = "maven" 
grails.project.repos.default="REPO_NAME_IN_NEXUS" 
grails.release.scm.enabled=false 

//Example:
//grails.project.repos."my-grails-plugins".url="http://nexus.mycomp.net:8081/nexus/content/repositories/my-grails-plugins"
//grails.project.repos."my-grails-plugins".type = "maven" 
//grails.project.repos.default="my-grails-plugins" 
//grails.release.scm.enabled=false
 

Friday, September 6, 2013


JOKES

------------------------------------------------------------------------------------------------------
Socialism: You have two cows, and you give one to your neighbor.
Communism:You have two cows,the government takes both and gives you the milk.
Fascism:You have two cows,the government takes both and sells you the milk.
Nazism:You have two cows,the government takes both and shoots you.
Bureaucrat-ism: You have two cows,the government takes both, shoots one, milks the other and throws the milk away.
Capitalism: You have two cows, you sell one and buy a bull to produce more animals
-------------------------------------------------------------------------------------------------------

Thursday, September 5, 2013


Accessing Grails components (Controllers and Services etc) from grails-app in classes /src/groovy

Requirement:
There is a need , sometimes, for groovy classses in /src/groovy/pkg1/ to access/work with Grails components (ex. services).  The service/controller/domain/views components are in /grails-app directory and can see/access each other. The classes (.groovy or .java) in /src/groovy or /src/java cannot see them.

Solution:

//Import the required classes
import org.codehaus.groovy.grails.web.context.ServletContextHolder as SCH
import org.codehaus.groovy.grails.web.servlet.GrailsApplicationAttributes as GA
class GetServicesHelper {
   def getMyService(){
        //Get ServletContext 
        def servletContext = SCH.servletContext
        //Get GrailsApplicationContext from GrailsApplicationAttributes saved in ServletContext
        def grailsApplicationContext = servletContext.getAttribute(GA.APPLICATION_CONTEXT)
        //Get the service that is injected into Grails Application Context
        def myService = grailsApplicationContext.myService
        return myService
    }
}

Monday, August 26, 2013

Perception


Once there was this guy who was in love with a girl. She wasn't the most beautiful and gorgeous but for him, she was everything.
He used to dream about her, about spending the rest of his life with her.
His friends told him, "Why do you dream so much about here, when you don't even know if she loves you or not? First tell her your
feelings, and get to know if she likes you or not". He felt that was the right way. The girl knew from the beginning that this guy loved her.
One day when he proposed, she rejected him.

His friends thought he would take to alcohol, drugs etc. and ruin his life. To their surprise, he was not depressed. When they asked
him how was it that he was not sad, he replied, "Why should I feed bad? I lost one who never loved me and she lost the one who really loved
and cared.
"When life give you a 100 reason to cry, show life that you have 1000 reason to smile."
"Life is wonderful if you know how to live."

Grails Application configuration in Websphere container.

For the first time install of Groovy/Grails app on any server, make sure following properties are set for the web container on all application servers/nodes/clusters.

§         In "Application servers > server name > Process Definition > Java Virtual Machine" add to the "Generic JVM arguments"
       -Xverify:none

§         In "Application servers > server name > Process Definition > Java Virtual Machine > Custom Properties", add a custom property
   name: com.ibm.ws.classloader.getInputStream.enableIOException
   value: true
  description: Invoke IO Exception override processing

§         In "Application servers > server name > Web container > Custom Properties", add a custom property
     name: com.ibm.ws.webcontainer.invokeFiltersCompatibility
     value: true

     description: Invoke Filter compatibility patch


Websphere WAS 6.1/7 often logs the following exceptions into SystemOut.log files.


[Servlet Error]-[Filter [DeclaredResourcesPluginFilter]: filter is unavailable.]: java.lang.NullPointerException
    at com.ibm.ws.webcontainer.srt.SRTServletResponse.setContentType(SRTServletResponse.java:1141)


Solution:
1. Log into Admin console of Websphere Apllication Server.
2. Navigate to

WAS Admin -> Environments -> Virtual Hosts -> default_host -> MIME Types

Add/Modify following as the MIME TYPE 

MIME Type
Extensions
image/gif
GIF gif
image/jpeg
JPE JPEG JPG jpe jpeg jpg
image/tiff
TIFF TIF tiff tif
image/png
PNG png
image/psd
PSD psd
image/icon
ICON ICO icon ico


Note: The Extensions can be separated by whitespace


Do it in all Virtual Hosts.

See the below image for reference.


Thursday, April 25, 2013

Interesting story on Finance


Here's a very interesting anecdote that describes how an 'asset bubble' builds up and what are its consequences. Read it even if it confuses you a bit...things will be clear as you reach the end.... 
ANCEDOTE - Once there was a little island country. The land of this country was the tiny island itself. The total money in circulation was 2 dollar as there were only two pieces of 1 dollar coins circulating around.

1) There were 3 citizens living on this island country. A owned the land. B and C each owned 1 dollar.
2) B decided to purchase the land from A for 1 dollar. So, A and C now each own 1 dollar while B owned a piece of land that is worth 1 dollar.The net asset of the country = 3 dollar.
3) C thought that since there is only one piece of land in the country and land is non produce-able asset, its value must definitely go up. So, he borrowed 1 dollar from A and together with his own 1 dollar, he bought the land from B for 2 dollar. A has a loan to C of 1 dollar, so his net asset is 1 dollar. B sold his land and got 2 dollar, so his net asset is 2 dollar. C owned the piece of land worth 2 dollar but with his 1 dollar debt to A, his net asset is 1 dollar.The net asset of the country = 4 dollar.
4) A saw that the land he once owned has risen in value. He regretted selling it. Luckily, he has a 1 dollar loan to C. He then borrowed 2 dollar from B and acquired the land back from C for 3 dollar. The payment is by 2 dollar cash (which he borrowed) and cancellation of the 1 dollar loan to C. As a result, A now owned a piece of land that is worth 3 dollar. But since he owed B 2 dollar, his net asset is 1 dollar. B loaned 2 dollar to A. So his net asset is 2 dollar. C now has the 2 coins. His net asset is also 2 dollar.The net asset of the country = 5 dollar. A bubble is building up.
5) B saw that the value of land kept rising. He also wanted to own the land. So he bought the land from A for 4 dollar. The payment is by borrowing 2 dollar from C and cancellation of his 2 dollar loan to A. As a result, A has got his debt cleared and he got the 2 coins. His net asset is 2 dollar. B owned a piece of land that is worth 4 dollar but since he has a debt of 2 dollar with C, his net Asset is 2 dollar. C loaned 2 dollar to B, so his net asset is 2 dollar.
The net asset of the country = 6 dollar. Even though, the country has only one piece of land and 2 Dollar in circulation.
6) Everybody has made money and everybody felt happy and prosperous.
7) One day an evil wind blowed. An evil thought came to C's mind. 'Hey, what if the land price stop going up, how could B repay my loan. There is only 2 dollar in circulation, I think after all the land that B owns is worth at most 1 dollar only.' A also thought the same.
8) Nobody wanted to buy land anymore. In the end, A owns the 2 dollar coins; his net asset is 2 dollar. B owed C 2 dollar and the land he owned which he thought worth 4 dollar is now 1 dollar. His net asset become -1 dollar. C has a loan of 2 dollar to B. But it is a bad debt. Although his net asset is still 2 dollar, his Heart is palpitating.The net asset of the country = 3 dollar again.Who has stolen the 3 dollar from the country?
Of course, before the bubble burst B thought his land worth 4 dollar. Actually, right before the collapse, the net asset of the country was 6 dollar in paper. his net asset is still 2 dollar, his heart is palpitating.The net asset of the country = 3 dollar again.
9) B had no choice but to declare bankruptcy. C as to relinquish his 2 dollar bad debt to B but in return he acquired the land which is worth 1 dollar now. A owns the 2 coins, his net asset is 2 dollar. B is bankrupt, his net asset is 0 dollar. ( B lost everything ) C got no choice but end up with a land worth only 1 dollar (C lost one dollar)

The net asset of the country = 3 dollar.


 There is however a redistribution of wealth. A is the winner, B is the loser, C is lucky that he is spared. A few points worth noting –
1) When a bubble is building up, the debt of individual in a country to one another is also building up.
2) This story of the island is a close system whereby there is no other country and hence no foreign debt. The worth of the asset can only be calculated using the island's own currency. Hence, there is no net loss.
3) An over-damped system is assumed when the bubble burst, meaning the land's value did not go down to below 1 dollar.
4) When the bubble burst, the fellow with cash is the winner. The fellows having the land or extending loan to others are the loser. The asset could shrink or in worst case, they go bankrupt.
5) If there is another citizen D either holding a dollar or another piece of land but refrain to take part in the game. At the end of the day, he will neither win nor lose. But he will see the value of his money or land go up and down like a see saw.
6) When the bubble was in the growing phase, everybody made money.
7) If you are smart and know that you are living in a growing bubble, it is worthwhile to borrow money (like A ) and take part in the game. But you must know when you should change everything back to cash.
8) Instead of land, the above applies to stocks as well.
9) The actual worth of land or stocks depends largely on psychology.

Tuesday, March 19, 2013

Difference between OLTP and OLAP systems

Online Transaction Processing Systems Online Analytical Processing Systems
Operational Data and original source of data. The Data (integrated) comes from various OLTP systems
Application specific, Detailed and most currrent/recent data. Historical data collected from various systems to support Business decision, planning and reporting
Performance is predicted as per application architecture and design. Performance is not predicted or mandated.
Most recent data with several Insert/Update operations. Read only data.
Highly Normalized for performance. Minimal normalization with restructuring of data.
Not (least) used for reporting and analysis. High analysis for business decisions.
Many transactions. low (none) transactions.
Low to moderate space is required. Very large space is required to support volumes of data.
Backup and recovery is critical to organization. Backup is not very critical. Reloading the OLTP data is a recovery practice.

Thursday, March 3, 2011

Log4J Architecture and Configuration

The fundamental principle of Log4j is "A Logger writes a message into an Appender with a Level and then formatted by Layout and Pattern before writing into Destination/Output".
The following steps explain in simple terms from an application perspective.
1. An Application (JEE or client/server etc..) reads and loads the Log4j configuration file from a desired location into JVM.
2.From an Application , a Logger (a class from java package) writes a message with Level (debug, info, warn, error, fatal etc..).
3. An Appender (Console, File, Rolling File, SMTP, JDBC or JMS etc..) is configured to filter (debug, info, warn, error, fatal etc..) received messages before writing them with a Layout (Pattern, HTML, XML etc..) and Pattern (conversion) into a destination (File, Database, Email, Message Queue/Topic or Terminal Console etc..).


The Log4J configuration is maintained either in .xml or . properties file for an application.
It's highly recommended to have only one configuration per application, though multiple configurations are also supported.
In a standard scenario, A JEE application uses or depends on following types of libraries.
1. Libraries from Java Standard Edition platform (J2SE1.4.x, Java5 or Java6 etc..).
2. Libraries from Java Enterprise Edition platform (J2EE1.4 or JEE1.5 etc..), provided by container- vendor.
3. Libraries from 3rd Party providers (JDBC drivers, Apache Commons, Framework {spring, struts, hibernate}, JMS etc..).
4. Libraries from enterprise/corporate (LDAP access, utils, etc...),  reusable components for other enterprise applications.
5. Libraries created for specific application.
6. Classes created for application but not reusable in other components.


The sample enterprise application (sales-app-1.3.ear), shown in below image, consists of one web application (app1.war) and 3 EJB components (com-abc-ejb1-1.2.jar, com-abc-ejb2-2.1.jar and com-abc-ejb3-4.2.jar).   The web application uses 3rd party framework (Spring, Struts and Hibernate) libraries, a few enterprise (abc*) libraries and application (app1) specific libraries. As the enterprise application runs inside the confinements of JEE container, it will have to depend on  libraries provided by Vendor.
The application will also use libraries form Java Standard Edition platform.
The application may also use other 3rd party vendor-libraries (Ex. Oracle, mysql JDBC drivers..etc..) configured in container as shared libraries or packaged within application.


Lo4J Configuration for sample JEE application


1. Create a Log4j.xml ( I prefer .xml configuration over .properties for readability and maintainability reasons). 
   Note: Keeping the Log4j.xml file outside of application (.war) file provides flexibility of tweaking the log output based on diagnosing problem in an environment.
2. Create a ConsoleAppender for all DEBUG level Messages with no/default layout.

<!--Create a Console Appender that can have messages only level DEBUG, INFO, WARN, ERROR and FATAL -->
  <appender name="STDOUT_APPENDER" class="org.apache.log4j.ConsoleAppender">
    <layout class="org.apache.log4j.PatternLayout">
          <param name="ConversionPattern" value="%c %d{ISO8601} -- %p -- %m%n"/>
    </layout>
<filter class="org.apache.log4j.varia.LevelRangeFilter">
      <param name="LevelMin" value="DEBUG" />
    </filter>
  </appender>
3. Create a RollingFileAppender for all DEBUG level messages with Pattern Layout.

<!--Create a Rolling File Appender that can have messages only level DEBUG, INFO, WARN, ERROR, FATAL -->

  <appender name="DEBUG_APPENDER" class="org.apache.log4j.RollingFileAppender">
     <param name="File" value="/var/log/sales/app1/ALL_DEBUG.log"/>
     <param name="Append" value="true"/>
     <param name="MaxFileSize" value="1000KB"/>
     <param name="MaxBackupIndex" value="2"/>
    <layout class="org.apache.log4j.PatternLayout">
          <param name="ConversionPattern" value="%c %d{ISO8601} -- %p -- %m%n"/>
    </layout>
  </appender>


4. Create a RollingFileAppender for all INFO level messages with Pattern Layout.

<!--Create a Rolling File Appender that can have messages only level above INFO, WARN, ERROR, FATAL -->


  <appender name="INFO_APPENDER" class="org.apache.log4j.RollingFileAppender">
     <param name="File" value="/var/log/sales/app1/ALL_INFO.log"/>
     <param name="Append" value="true"/>
     <param name="MaxFileSize" value="1000KB"/>
     <param name="MaxBackupIndex" value="2"/>
    <layout class="org.apache.log4j.PatternLayout">
          <param name="ConversionPattern" value="%c %d{ISO8601} -- %p -- %m%n"/>
    </layout>
    <filter class="org.apache.log4j.varia.LevelRangeFilter">
      <param name="LevelMin" value="INFO" />
    </filter>
  </appender>


5. Create a RollingFileAppender for all WARN messages.
<!--Create a Rolling File Appender that can have messages only level above  WARN, ERROR, FATAL -->

  <appender name="WARN_APPENDER" class="org.apache.log4j.RollingFileAppender">
     <param name="File" value="/var/log/sales/app1/ALL_WARN.log"/>
     <param name="Append" value="true"/>
     <param name="MaxFileSize" value="1000KB"/>
     <param name="MaxBackupIndex" value="2"/>
    <layout class="org.apache.log4j.PatternLayout">
          <param name="ConversionPattern" value="%c %d{ISO8601} -- %p -- %m%n"/>
    </layout>
    <filter class="org.apache.log4j.varia.LevelRangeFilter">
      <param name="LevelMin" value="WARN" />
    </filter>
  </appender>

6. Create a RollingFileAppender for all ERROR messages.


<!--Create a Rolling File Appender that can have messages only level above  ERROR, FATAL -->
  <appender name="ERROR_APPENDER" class="org.apache.log4j.RollingFileAppender">
     <param name="File" value="/var/log/sales/app1/ALL_ERROR.log"/>
     <param name="Append" value="true"/>
     <param name="MaxFileSize" value="1000KB"/>
     <param name="MaxBackupIndex" value="2"/>
    <layout class="org.apache.log4j.PatternLayout">
          <param name="ConversionPattern" value="%c %d{ISO8601} -- %p -- %m%n"/>
    </layout>
    <filter class="org.apache.log4j.varia.LevelRangeFilter">
      <param name="LevelMin" value="ERROR" />
    </filter>
  </appender>


7. Configure ROOT logger to write into APPENDERS with DEBUG priority.

  <!-- Register a rootlogger with DEBUG priority and register appenders. 
  This conifguration allows APPLICATION to write ALL messages from all LOGGERS(application, enterprise, framework classes and 3rd Party) into registered APPENDERs.
  Each APPENDER is configured filter only messages of certain LEVEL -->
  <root>
    <priority value="debug"/>
    <appender-ref ref="STDOUT_APPENDER"/>
    <appender-ref ref="DEBUG_APPENDER"/>
    <appender-ref ref="INFO_APPENDER"/>
    <appender-ref ref="WARN_APPENDER"/>
    <appender-ref ref="ERROR_APPENDER"/>
  </root>


8. Create a RollingFileAppender for messages from application loggers (classes in com.abc.app1 package). 
<!--Create a Rolling File Appender for DEBUG level messages only from  loggers/classes in 'com.abc.app1' -->
  <appender name="APP1_APPENDER" class="org.apache.log4j.RollingFileAppender">
     <param name="File" value="/var/log/sales/app1/APP1-DEBUG.log"/>
     <param name="Append" value="true"/>
     <param name="MaxFileSize" value="10000KB"/>
     <param name="MaxBackupIndex" value="10"/>
    <layout class="org.apache.log4j.PatternLayout">
          <param name="ConversionPattern" value="%c %d{ISO8601} -- %p -- %m%n"/>
    </layout>
</appender>


9. Configure APPLICATION specific Logger:  Log all DEBUG messages from loggers whose package is com.abc.app1 into 'APP1_APPENDER'

<logger name="com.abc.app1">
<level value="debug"/>  
<appender-ref ref="APP1_APPENDER" /> 
  </logger> 


10. Configure a component (Servlet, Action or a bean in applicationContext.xml of spring DI) to load this log4j.xml file into JVM for application before any other custom component is loaded.
11. Make ONLY one version of log4j.jar available to application. Remove all additional and external configurations to avoid inconsistencies.


A sample Log4j.xml is provided for reference. Tuning and Tweaking is required based on environment. Download from https://docs.google.com/leaf?id=0B0YbuPQCG3jtZmMzYmE1OGEtM2YyYi00ZTA3LTg3ZmEtMzNjOTUyZGJkNGUx&hl=en&authkey=CKfngsgK


Deploy your application into JEE container verify if the messages are logged with different levels into destination/output as per configuration.


I've addressed basic and core concepts of Log4J that are good enough to configure medium to large scale applications. If you are looking for more features then browse to http://logging.apache.org/index.html .


I've noticed that behavior of Log4J is NOT very consistent across different J2EE servers as their internal class loading mechanisms are different. Please google it in such cases. 


If log4j.x.x jar is loaded from outside of application then it's behavior is very inconsistent, one good and quick fix is to remove all versions of log4j jars from ALL classpath entries and ship only one version of jar within application. This ensures there is only one lo4j.x.x.jar loaded for application.


Have happy logging!

Thursday, February 17, 2011

WAS (Websphere Application Server) throws 404 (Resource not found) error though a resource is available in application

Problem: 
The WAS (Websphere Application Server) does not recognize the request for a resource though it exists in Web application (WAR file).


Solution: The WAS, by default, does not invoke the servlet filter for every resource until it is explicitly configured in server.
When a request comes for a URL resource, the WAS throws 404 error as if the requested resource is not available in application though it exists.


Follow the below steps to configure in WAS
a. Login to WAS Admin console application (  http(s)://MYHOST:9443/ibm/console  ).
b. Expand 'Servers' node in left pane and click on 'Application Servers'.
c. Select the <'application server instance> from available application servers
d. Click on 'Web Container' under 'Container Settings' header.
e. Select 'custom properties' under 'Additional Properties' header.
f. Add or update the value to 'true' for property (com.ibm.ws.webcontainer.invokefilterscompatibility).
  This helps WAS to invoke Filter compatibility for resources.
g. Save and restart the app server instance.


Please see below image for reference.

Thursday, February 3, 2011

Maven support for Grails application in SpringSource Tool Suite (STS) IDE

System requirements.
JDK1.5 or 1.6, Maven2, SpringSource Tools Suite and internet connection.

1. Download and Install JDK (1.5 or 1.6.x), set JAVA_HOME variable in system.
2. Download and Install Maven2.x and set installed location to a system variable (M2_HOME)
a. Create a system variable (MAVEN_OPTS) with the following value.
-Xmx1024m -XX:MaxPermSize=192m

3. Download & Install SpringSource Tool Suite (STS) from SpringSource site (http://www.springsource.com/developer/sts). You may have to register to  download it.
4. Download and Install following extensions for STS. Navigate to 'Dashboard' from 'Help' menu. Select 'Extensions' tab. Select the below 2 extensions and click on "Install" button. Configure proxy in IDE if required.

   a. "Grails (Current Production Release)"
   b. "Grails Support" under Language and Framework Tooling' header
  

5. Restart the STS IDE when requested to do so.
6. Set 'Grails' installed directory (ex.C:\springsource\grails-1.3.6) to a system variable (GRAILS_HOME)
7. Select 'Grails' perspective in IDE.
8. Open 'atchetype-catalog.xml', available in User home (Ex. C:\Documents and Settings\USER1\.m2), add following lines between archetypes elements. If file does not exist create one.

<archetypes>
<archetype>
<groupId>org.grails</groupId>
<artifactId>grails-maven-archetype</artifactId>
<version>1.3.6</version>
<description>archetype-grails-1.3.6-webapp</description>
</archetype>

</archetypes>


Assuming the settings.xml (maven configuration information) is also available in same (C:\Documents and Settings\USER1\.m2) directory and configured with intranet/local or internet maven repositories.

9. Create a new Maven Project using the above archetype.
a. select File ->New --> Other from menubar.
b. type/search for Maven in input box (refer below image) and select "Maven Project"


c. Click 'Next' button to select 'grails-maven-archetype'. If not found then see if your machine is configured to connect a maven respository and download the 'grails-maven-archetype' plugin.
You may have to restart IDE.


d. Click 'Next' to enter maven coordinates for your sample (MyFirstGrailsProj) grails project.

e. Hit 'Finish' button. The IDE takes a few minutes to create a project with Grails environment. Please observe the outpont 'Maven Console' from 'Console' view.

10. Apply 'Grails nature or capabilities' to 'MyFirstGrailsProj'


IDE takes a few minutes to apply the Grails/Groovy behavior/settings to project. Observe output on Console tab/window.

11. Verify if Step 10 is successful. Please refer to below images.


12. Clean the project.
Select 'Clean' from 'Project' in Menubar

12. Select 'Run As' -> 'maven clean' from context menu of project. Observe 'BUILD SUCCESSFUL' in output of 'Maven Console' and 'Console' windows.
Please fix errors if there are any.

13. Select 'Run As' -> 'maven install' from context menu of project. Observe 'BUILD SUCCESSFUL' in output of 'Maven Console' and 'Console' windows.
Please fix errors if there are any.

14. 'Refresh' project once in a while, as sometimes IDE does not get synced with File System.

15. Run commands of Grails on project by either using menu options or keyboard.
a. Using Menu option.


b. Select the project hit ALT + CTRL+ SHIFT + G keys to see a small popup window then type required Grails command (runapp) and hit Enter key.


Please observe the following output in Cosole window.
Server running. Browse to http://localhost:8080/MyFirstGrailsProj
Clicking on the link will display a home page of deployed application..

Thursday, March 25, 2010

Maven JAXWS pulgin for web services

Developing a WebService and Client has been made real simple with JAX-WS technology as part of Jee1.5 specification.

In JAX-RPC the service and clients have to have proxies (Skeletons at service and Stubs at client) to establish the communication, because Bindings and parsings are proproitery and deployment descriptors are required during execution/runtim.

Since JDK1.5 has come up with annotations that enable JEE5.0 to arrive with new feature (a dynamic proxy generation) during execution time which eliminated stubs, skeletons generation and deployment descriptors.

The Dynamic Proxy client is dynamically generated at run time using the Java 5 Dynamic Proxy functionality, while the JAX-RPC-based stub client is a non-portable Java file that is generated by tooling. Unlike the JAX-RPC stub clients, the Dynamic Proxy client does not require you to regenerate a stub prior to running the client on an application server for a different vendor because the generated interface does not require the specific vendor information.

To minimize the developer effort to create webservice and client, I've created a sample maven-archetype that uses jaxws-maven-plugin from org.apache.maven.plugins. The archetype creates a sample webservice (AppWS) with one method  (sayHello) and client (AppWSClient) to access the service.

Junit test cases are also provided to prove service and clients and tested are successfully.

Please follow below steps to feel the webservice and client creation using JAX-WS.


Assumptions: Any IDE (I've used NetBean6.8) is preferred that allows to develop JEE1.5 applications on Maven, ANT and any JEE 5 server (Ex. Glassfish V2 orV3 or WAS7.0 and WAS6.1 with JAXWS enabled).


1. Download and extract mycompany-archetype-j2ee1.5-jaxws.rar into local machine
2. Run mvn (assuming Maven 2.x is installed)
3. Notice mycompany-archetype-j2ee1.5-jaxws-1.0.jar created in local maven2 repository (Ex. USERHOME/.m2\repository\org\mycompany\archetypes\mycompany-archetype-j2ee1.5-jaxws\1.0 )
4. Add this new archetype to USERHOME/.m2/archetype-catalog.xml)

 <archetype>
   <groupId>org.mycompany.archetypes</groupId>
   <artifactId>mycompany-archetype-j2ee1.5-jaxws</artifactId>
   <version>1.0</version>
   <description>mycompany-archetype-j2ee1.5-jaxws</description>
</archetype>
 
Creating a Project from mycompany-archetype-j2ee1.5-jaxws(1.0)
5. Create a new project (ex. jaxwsSample1) from this archetype


 6. Click on 'Next' button to select this archetype

 
7. Click on 'Next' button provide project and maven coordinates.
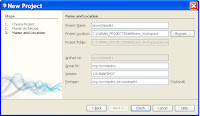


 8. Click on 'Finish' to see 4 projects getting created from archetype
  Maven main/parent project that has web project (jaxwsSample1WS), ear project (jaxwsSample1WSEAR) and Webservice client jar(jaxwsSample1Client)

9. Right Click on jaxwsSample1 project and select 'Set as Main Project'. This is only for NetBeans. As pom.xml of jaxwsSample1 has the information of other 3 projects as modules, a clean,build and install goals on this project builds the other 3 projects too.

IRAD7.5 has some difficulties in identifying maven enabled parent-child projects.

10. Right click on jaxwsSample1 and select Clean and Build menu item  
 

11. Observe the output on console. The jaxwsSample1WS and jaxwsSample1WSEAR are successful and jaxwsSample1Client is failed.
It is because client needs .wsdl file of WS to build successfully.
12. Deploy jaxwsSample1WSEAR-1.0-SNAPSHOT.ear into JEE5 Server (ex. Glassfish v3) and then run maven for client with some changes in pom.xml of client.

13. Run AdminConsole of server (Glassfish) to deploy the application. Any JEE5.0 Server that has JAXWS enabled can be used. Deploy jaxwsSample1\jaxwsSample1WSEAR\target\jaxwsSample1WSEAR-1.0-SNAPSHOT.ear file.


14. Click on 'OK" button deploy


15. Verify to access the deployed application at http://localhost:8080/jaxwsSample1/AppWSService?wsdl . The server and port can be different in your scenario. If there is no error (404, 500 or 403) then see view source of page using context-menu on page.


16. Open pom.xml for client and refer to use wsdl provided by WebService running in server.


The client can use .wsdl file available with source of service or obtain while service is running. 
In production (not demo) version it is recommended to copy .wsdl file into client source instead of obtaining from server.

17a.  Now rebuild all the projects  or just client.  Please move to Netbeans to select jaxwsSample1Client as Main Project to build only client


17b. Select 'Clean and Build' from context-menu to just build client.


All above steps instructed you to create a webservice (war and ear) and a client (jar) to use the webservice.

Please notice all the output files (.war, .ear and .jar) files are created at maven local repository (USERLOCAL/.m2\repository\org\mycompany).


Have fun.

Tuesday, March 9, 2010

Unable to find javac compiler while running Ant from Maven2.

If your maven2 pom.xml is using a plugin (maven-antrun-plugin) to run ANT build.xml and a javac task is used in it to compile source then it is very usual to get the following error.

Reason: An Ant BuildException has occured: The following error occurred while executing this line:
C:\maventest\build.xml:79: Unable to find a javac compiler;
com.sun.tools.javac.Main is not on the classpath.
Perhaps JAVA_HOME does not point to the JDK.
It is currently set to ..***\***\jre.

Cause: When Maven2 runs pom.xml it uses the jre (%JAVA_HOME%\jre) instead of %JAVA_HOME% and when ant build is using 'javac' task then maven2 tries to find javac in %JAVA_HOME%\jre.

Solution: Any of the following three can be used. Solution 1 is prefered.

1. Provide a property in pom.xml for maven-antrun-plugin to fork/use javac as an external process. Please see image for reference
2. In pom.xml for maven-compiler-plugin add a property to fork out the javac process.
Read more about the properties of this plugin at http://maven.apache.org/maven-1.x/plugins/java/properties.html

<properties>
<maven.compile.fork>true</maven.compile.fork>
<properties>
 
either under  element or under of  maven-compiler-plugin.
 
3. In ant build.xml at javac task use an attribue fork='true'

Wednesday, October 14, 2009

Web service client (J2EE App) accessing Web Service over Https or SSL

I've recently encountered a situation where a J2EE application needs to access web service that is available on https (SSL). I've realized that accessing the web service over https and http are not alike, specifically when certificate comes in between.

In a usual scenario when a user access the secured site (https://******) in browser the server supplies the certificate to browser and when user agrees to the certificate as reliable/trusted communication, the certificate gets stored in browser. By agreeing the above step the browser assumes the subsequent communication is trusted with server, and does not request user to agree to certificate for every communication.

By analyzing the above handshake, having a java program to authorize/authenticate the communication each time when service is contacted is painful. Since J2ee application (WS client) is running in J2EE server, a smart decision is to let the trusted relationship is established between J2EE Server and Web Service. This allows any application that runs in J2EE Server can access Web Service over Https.

To achieve above I've done following things.

1. Accessed the service on https from browser and opened the certificate (see lock icon in below image.
I did not mind about the validity of response, my intention was to obtain the certificate.


2. Copied (Copy to File) the certificate into a file (xyz.cer) into a directory
Please see the below images. I've used IE6.x browser. The importing/copying of .cer file may be different in different browsers.


3. Uploading/Exporting the .cer file to the J2EE Server Security.

In my case I'm deploying the J2EE application (WS client) is deployed into Websphere Server 6.0.2 (WAS), I need to know what JKS file the WAS is using for SSL communication.

a. Finding JKS file that server is using.
Login to WAS with administration account.
OR
Start the 'Admin console' from context menu of WAS server instance from IDE (Eclipse/IRAD/WSAD).


Navigate to SSL > SSL configuration repertoires > /DefaultSSLSettings
and note down the value (${USER_INSTALL_ROOT}/etc/DummyServerTrustFile.jks) of 'Trust file name'. In your case 'Trust file name' value may be different.

Note: The image is conveying wrong and needs to be corrected.


Now export the cert file into ${USER_INSTALL_ROOT}/etc/DummyServerTrustFile.jks using KeyMan tool.
Navigate to the location keyman tool (C:\Program Files\IBM\Rational\SDP\6.0\runtimes\base_v6\bin\ikeyman.bat) and double click on it to see the application running. See the below image for reference. If ikeyman.bat does not run then run ikeyman_old.bat.


Click on 'Key Database File' > 'New' from Menu to locate the JKS file is configured to use the server. See below images for reference.


The DummyServerTrustFile.jks is located in the profile (C:\Program Files\IBM\Rational\SDP\6.0\runtimes\base_v6\profiles\default\etc\) that I'm using.

Save/Overwrite the file with changes. Enter the default password WebAS


Add xyz.cer to this (DummerServerTrustFile.jks) truststore.


Give a Label name to recoginze the certificate (xyz.cer) in Truststore (DummyServerTrustFile.jks)


Save the Label and see it in 'Key Database Content' pane. Exit from Keyman tool.


4. Restart the Websphere Application Server for changes to Trusted Store is effective.

5. If you have recieved wsdl file either through UDDI or Registery Explorer, generate client stubs and JAR them.
NOTE: IRAD6.0.2 has provided me different (Apache Axis 1.0, IBM SOAP and IBM WebSphere) Web service runtimes and each of them has one or the other problems .
a. Apache Axis 1.0 - java.lang.NoClassDefFoundError: sun/security/provider/Sun
b. IBM WebSphere - Communication was established with WS* only the initial or first time and could not reestablish for subsequent requests. In some occasions WAS was restarted. The error (Server Response Read is Failed) was observed for every request.


I've preferred Apache Axis 1.1 or later runtime.
 

The internet search on runtime problems provided me the following suggestion
There might be a reference in axis1.0 classes to the sun security class - which ignores any dynamically set classes in non SUN JDK environments.

 
6. Use Stubs in your J2EE application. See the example below
ExternalServiceLocator locator = new ExternalServiceLocator();
ExternalService extService= locator.getExternalService();
OR
ExternalService extService= locator.getExternalService(new URL ("https://example.external.service.com"));

String result = extService.getOperation1();

7. I've not run into any problems while running WS Client.
I've not used any of following security System properties settings in code or in server. If you run into problems try setting the following properties at WAS-JVM level ( Application servers > server1 > Process Definition > Java Virtual Machine > Custom Properties )


OR
at WS-Client code before accessing WS in Step 6


String fileName = "your jks file with absolute path";
String passwd = "your jks file password"; //Default is 'WebAS' for IBM WebSphere
System.setProperty("javax.net.ssl.trustStore", fileName);
System.setProperty("javax.net.ssl.trustStorePassword", passwd);
System.setProperty("javax.net.ssl.keyStore", fileName);
System.setProperty("javax.net.ssl.keyStorePassword", passwd);

If proxy server authentication is required for WS Client, then additionally configure the HTTP or HTTPS proxyUser and proxyPassword transport properties using one of the methods specified.
To access the Web Proxy over HTTP
System.setProperty("http.proxyHost", "YOUR_PROXY_SERVER_NAME");
System.setProperty("http.proxyPort", "YOUR_PROXY_SERVER_PORT");
System.setProperty("http.proxyUser","PROXY_USER_NAME");
System.setProperty("http.proxyPassword","PROXY_USER_PWD");

To access the Web Proxy over HTTPS
System.setProperty("https.proxyHost", "YOUR_PROXY_SERVER_NAME");
System.setProperty("https.proxyPort", "YOUR_PROXY_SERVER_PORT");
System.setProperty("https.proxyUser","PROXY_USER_NAME");
System.setProperty("https.proxyPassword","PROXY_USER_PWD");


NOTE: If you are accessing the https service from corporate environment make sure your Application Server can establish the connection with Web Service. In my experience my Webpsphere server was restricted from accessing the external Web Service so I had disconnected the server from corporate network and connected to internet over Wireless, was able to access the Web Service.

You may run into some proxy related issues, please correct them before you conclude that your client is able to access WS*.