Problem:
The WAS (Websphere Application Server) does not recognize the request for a resource though it exists in Web application (WAR file).
Solution: The WAS, by default, does not invoke the servlet filter for every resource until it is explicitly configured in server.
When a request comes for a URL resource, the WAS throws 404 error as if the requested resource is not available in application though it exists.
Follow the below steps to configure in WAS
a. Login to WAS Admin console application ( http(s)://MYHOST:9443/ibm/console ).
b. Expand 'Servers' node in left pane and click on 'Application Servers'.
c. Select the <'application server instance> from available application servers
d. Click on 'Web Container' under 'Container Settings' header.
e. Select 'custom properties' under 'Additional Properties' header.
f. Add or update the value to 'true' for property (com.ibm.ws.webcontainer.invokefilterscompatibility).
This helps WAS to invoke Filter compatibility for resources.
g. Save and restart the app server instance.
Please see below image for reference.
Thursday, February 17, 2011
Thursday, February 3, 2011
Maven support for Grails application in SpringSource Tool Suite (STS) IDE
System requirements.
JDK1.5 or 1.6, Maven2, SpringSource Tools Suite and internet connection.
1. Download and Install JDK (1.5 or 1.6.x), set JAVA_HOME variable in system.
2. Download and Install Maven2.x and set installed location to a system variable (M2_HOME)
a. Create a system variable (MAVEN_OPTS) with the following value.
-Xmx1024m -XX:MaxPermSize=192m
3. Download & Install SpringSource Tool Suite (STS) from SpringSource site (http://www.springsource.com/developer/sts). You may have to register to download it.
4. Download and Install following extensions for STS. Navigate to 'Dashboard' from 'Help' menu. Select 'Extensions' tab. Select the below 2 extensions and click on "Install" button. Configure proxy in IDE if required.
a. "Grails (Current Production Release)"
b. "Grails Support" under Language and Framework Tooling' header
5. Restart the STS IDE when requested to do so.
6. Set 'Grails' installed directory (ex.C:\springsource\grails-1.3.6) to a system variable (GRAILS_HOME)
7. Select 'Grails' perspective in IDE.
8. Open 'atchetype-catalog.xml', available in User home (Ex. C:\Documents and Settings\USER1\.m2), add following lines between archetypes elements. If file does not exist create one.
<archetypes>
<archetype>
<groupId>org.grails</groupId>
<artifactId>grails-maven-archetype</artifactId>
<version>1.3.6</version>
<description>archetype-grails-1.3.6-webapp</description>
</archetype>
</archetypes>
Assuming the settings.xml (maven configuration information) is also available in same (C:\Documents and Settings\USER1\.m2) directory and configured with intranet/local or internet maven repositories.
9. Create a new Maven Project using the above archetype.
a. select File ->New --> Other from menubar.
b. type/search for Maven in input box (refer below image) and select "Maven Project"
c. Click 'Next' button to select 'grails-maven-archetype'. If not found then see if your machine is configured to connect a maven respository and download the 'grails-maven-archetype' plugin.
You may have to restart IDE.
d. Click 'Next' to enter maven coordinates for your sample (MyFirstGrailsProj) grails project.
e. Hit 'Finish' button. The IDE takes a few minutes to create a project with Grails environment. Please observe the outpont 'Maven Console' from 'Console' view.
10. Apply 'Grails nature or capabilities' to 'MyFirstGrailsProj'
IDE takes a few minutes to apply the Grails/Groovy behavior/settings to project. Observe output on Console tab/window.
11. Verify if Step 10 is successful. Please refer to below images.
12. Clean the project.
Select 'Clean' from 'Project' in Menubar
12. Select 'Run As' -> 'maven clean' from context menu of project. Observe 'BUILD SUCCESSFUL' in output of 'Maven Console' and 'Console' windows.
Please fix errors if there are any.
13. Select 'Run As' -> 'maven install' from context menu of project. Observe 'BUILD SUCCESSFUL' in output of 'Maven Console' and 'Console' windows.
Please fix errors if there are any.
14. 'Refresh' project once in a while, as sometimes IDE does not get synced with File System.
15. Run commands of Grails on project by either using menu options or keyboard.
a. Using Menu option.
b. Select the project hit ALT + CTRL+ SHIFT + G keys to see a small popup window then type required Grails command (runapp) and hit Enter key.
Please observe the following output in Cosole window.
Server running. Browse to http://localhost:8080/MyFirstGrailsProj
Clicking on the link will display a home page of deployed application..
JDK1.5 or 1.6, Maven2, SpringSource Tools Suite and internet connection.
1. Download and Install JDK (1.5 or 1.6.x), set JAVA_HOME variable in system.
2. Download and Install Maven2.x and set installed location to a system variable (M2_HOME)
a. Create a system variable (MAVEN_OPTS) with the following value.
-Xmx1024m -XX:MaxPermSize=192m
3. Download & Install SpringSource Tool Suite (STS) from SpringSource site (http://www.springsource.com/developer/sts). You may have to register to download it.
4. Download and Install following extensions for STS. Navigate to 'Dashboard' from 'Help' menu. Select 'Extensions' tab. Select the below 2 extensions and click on "Install" button. Configure proxy in IDE if required.
a. "Grails (Current Production Release)"
b. "Grails Support" under Language and Framework Tooling' header
5. Restart the STS IDE when requested to do so.
6. Set 'Grails' installed directory (ex.C:\springsource\grails-1.3.6) to a system variable (GRAILS_HOME)
7. Select 'Grails' perspective in IDE.
8. Open 'atchetype-catalog.xml', available in User home (Ex. C:\Documents and Settings\USER1\.m2), add following lines between archetypes elements. If file does not exist create one.
<archetypes>
<archetype>
<groupId>org.grails</groupId>
<artifactId>grails-maven-archetype</artifactId>
<version>1.3.6</version>
<description>archetype-grails-1.3.6-webapp</description>
</archetype>
</archetypes>
Assuming the settings.xml (maven configuration information) is also available in same (C:\Documents and Settings\USER1\.m2) directory and configured with intranet/local or internet maven repositories.
9. Create a new Maven Project using the above archetype.
a. select File ->New --> Other from menubar.
b. type/search for Maven in input box (refer below image) and select "Maven Project"
c. Click 'Next' button to select 'grails-maven-archetype'. If not found then see if your machine is configured to connect a maven respository and download the 'grails-maven-archetype' plugin.
You may have to restart IDE.
d. Click 'Next' to enter maven coordinates for your sample (MyFirstGrailsProj) grails project.
e. Hit 'Finish' button. The IDE takes a few minutes to create a project with Grails environment. Please observe the outpont 'Maven Console' from 'Console' view.
10. Apply 'Grails nature or capabilities' to 'MyFirstGrailsProj'
IDE takes a few minutes to apply the Grails/Groovy behavior/settings to project. Observe output on Console tab/window.
11. Verify if Step 10 is successful. Please refer to below images.
12. Clean the project.
Select 'Clean' from 'Project' in Menubar
12. Select 'Run As' -> 'maven clean' from context menu of project. Observe 'BUILD SUCCESSFUL' in output of 'Maven Console' and 'Console' windows.
Please fix errors if there are any.
13. Select 'Run As' -> 'maven install' from context menu of project. Observe 'BUILD SUCCESSFUL' in output of 'Maven Console' and 'Console' windows.
Please fix errors if there are any.
14. 'Refresh' project once in a while, as sometimes IDE does not get synced with File System.
15. Run commands of Grails on project by either using menu options or keyboard.
a. Using Menu option.
b. Select the project hit ALT + CTRL+ SHIFT + G keys to see a small popup window then type required Grails command (runapp) and hit Enter key.
Please observe the following output in Cosole window.
Server running. Browse to http://localhost:8080/MyFirstGrailsProj
Clicking on the link will display a home page of deployed application..
Thursday, March 25, 2010
Maven JAXWS pulgin for web services
Developing a WebService and Client has been made real simple with JAX-WS technology as part of Jee1.5 specification.
In JAX-RPC the service and clients have to have proxies (Skeletons at service and Stubs at client) to establish the communication, because Bindings and parsings are proproitery and deployment descriptors are required during execution/runtim.
Since JDK1.5 has come up with annotations that enable JEE5.0 to arrive with new feature (a dynamic proxy generation) during execution time which eliminated stubs, skeletons generation and deployment descriptors.
The Dynamic Proxy client is dynamically generated at run time using the Java 5 Dynamic Proxy functionality, while the JAX-RPC-based stub client is a non-portable Java file that is generated by tooling. Unlike the JAX-RPC stub clients, the Dynamic Proxy client does not require you to regenerate a stub prior to running the client on an application server for a different vendor because the generated interface does not require the specific vendor information.
To minimize the developer effort to create webservice and client, I've created a sample maven-archetype that uses jaxws-maven-plugin from org.apache.maven.plugins. The archetype creates a sample webservice (AppWS) with one method (sayHello) and client (AppWSClient) to access the service.
Junit test cases are also provided to prove service and clients and tested are successfully.
Please follow below steps to feel the webservice and client creation using JAX-WS.
Assumptions: Any IDE (I've used NetBean6.8) is preferred that allows to develop JEE1.5 applications on Maven, ANT and any JEE 5 server (Ex. Glassfish V2 orV3 or WAS7.0 and WAS6.1 with JAXWS enabled).
1. Download and extract mycompany-archetype-j2ee1.5-jaxws.rar into local machine
2. Run mvn (assuming Maven 2.x is installed)
3. Notice mycompany-archetype-j2ee1.5-jaxws-1.0.jar created in local maven2 repository (Ex. USERHOME/.m2\repository\org\mycompany\archetypes\mycompany-archetype-j2ee1.5-jaxws\1.0 )
4. Add this new archetype to USERHOME/.m2/archetype-catalog.xml)
<archetype>
<groupId>org.mycompany.archetypes</groupId>
<artifactId>mycompany-archetype-j2ee1.5-jaxws</artifactId>
<version>1.0</version>
<description>mycompany-archetype-j2ee1.5-jaxws</description>
</archetype>
Creating a Project from mycompany-archetype-j2ee1.5-jaxws(1.0)
5. Create a new project (ex. jaxwsSample1) from this archetype
6. Click on 'Next' button to select this archetype
8. Click on 'Finish' to see 4 projects getting created from archetype
Maven main/parent project that has web project (jaxwsSample1WS), ear project (jaxwsSample1WSEAR) and Webservice client jar(jaxwsSample1Client)
9. Right Click on jaxwsSample1 project and select 'Set as Main Project'. This is only for NetBeans. As pom.xml of jaxwsSample1 has the information of other 3 projects as modules, a clean,build and install goals on this project builds the other 3 projects too.
IRAD7.5 has some difficulties in identifying maven enabled parent-child projects.
14. Click on 'OK" button deploy
15. Verify to access the deployed application at http://localhost:8080/jaxwsSample1/AppWSService?wsdl . The server and port can be different in your scenario. If there is no error (404, 500 or 403) then see view source of page using context-menu on page.
16. Open pom.xml for client and refer to use wsdl provided by WebService running in server.
The client can use .wsdl file available with source of service or obtain while service is running.
In production (not demo) version it is recommended to copy .wsdl file into client source instead of obtaining from server.
17a. Now rebuild all the projects or just client. Please move to Netbeans to select jaxwsSample1Client as Main Project to build only client
In JAX-RPC the service and clients have to have proxies (Skeletons at service and Stubs at client) to establish the communication, because Bindings and parsings are proproitery and deployment descriptors are required during execution/runtim.
Since JDK1.5 has come up with annotations that enable JEE5.0 to arrive with new feature (a dynamic proxy generation) during execution time which eliminated stubs, skeletons generation and deployment descriptors.
The Dynamic Proxy client is dynamically generated at run time using the Java 5 Dynamic Proxy functionality, while the JAX-RPC-based stub client is a non-portable Java file that is generated by tooling. Unlike the JAX-RPC stub clients, the Dynamic Proxy client does not require you to regenerate a stub prior to running the client on an application server for a different vendor because the generated interface does not require the specific vendor information.
To minimize the developer effort to create webservice and client, I've created a sample maven-archetype that uses jaxws-maven-plugin from org.apache.maven.plugins. The archetype creates a sample webservice (AppWS) with one method (sayHello) and client (AppWSClient) to access the service.
Junit test cases are also provided to prove service and clients and tested are successfully.
Please follow below steps to feel the webservice and client creation using JAX-WS.
Assumptions: Any IDE (I've used NetBean6.8) is preferred that allows to develop JEE1.5 applications on Maven, ANT and any JEE 5 server (Ex. Glassfish V2 orV3 or WAS7.0 and WAS6.1 with JAXWS enabled).
1. Download and extract mycompany-archetype-j2ee1.5-jaxws.rar into local machine
2. Run mvn (assuming Maven 2.x is installed)
3. Notice mycompany-archetype-j2ee1.5-jaxws-1.0.jar created in local maven2 repository (Ex. USERHOME/.m2\repository\org\mycompany\archetypes\mycompany-archetype-j2ee1.5-jaxws\1.0 )
4. Add this new archetype to USERHOME/.m2/archetype-catalog.xml)
<archetype>
<groupId>org.mycompany.archetypes</groupId>
<artifactId>mycompany-archetype-j2ee1.5-jaxws</artifactId>
<version>1.0</version>
<description>mycompany-archetype-j2ee1.5-jaxws</description>
</archetype>
Creating a Project from mycompany-archetype-j2ee1.5-jaxws(1.0)
5. Create a new project (ex. jaxwsSample1) from this archetype
7. Click on 'Next' button provide project and maven coordinates.
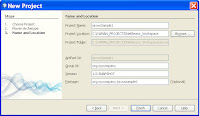
8. Click on 'Finish' to see 4 projects getting created from archetype
Maven main/parent project that has web project (jaxwsSample1WS), ear project (jaxwsSample1WSEAR) and Webservice client jar(jaxwsSample1Client)
9. Right Click on jaxwsSample1 project and select 'Set as Main Project'. This is only for NetBeans. As pom.xml of jaxwsSample1 has the information of other 3 projects as modules, a clean,build and install goals on this project builds the other 3 projects too.
IRAD7.5 has some difficulties in identifying maven enabled parent-child projects.
10. Right click on jaxwsSample1 and select Clean and Build menu item
11. Observe the output on console. The jaxwsSample1WS and jaxwsSample1WSEAR are successful and jaxwsSample1Client is failed.
It is because client needs .wsdl file of WS to build successfully.
12. Deploy jaxwsSample1WSEAR-1.0-SNAPSHOT.ear into JEE5 Server (ex. Glassfish v3) and then run maven for client with some changes in pom.xml of client.
13. Run AdminConsole of server (Glassfish) to deploy the application. Any JEE5.0 Server that has JAXWS enabled can be used. Deploy jaxwsSample1\jaxwsSample1WSEAR\target\jaxwsSample1WSEAR-1.0-SNAPSHOT.ear file.
14. Click on 'OK" button deploy
16. Open pom.xml for client and refer to use wsdl provided by WebService running in server.
The client can use .wsdl file available with source of service or obtain while service is running.
In production (not demo) version it is recommended to copy .wsdl file into client source instead of obtaining from server.
17a. Now rebuild all the projects or just client. Please move to Netbeans to select jaxwsSample1Client as Main Project to build only client
17b. Select 'Clean and Build' from context-menu to just build client.
All above steps instructed you to create a webservice (war and ear) and a client (jar) to use the webservice.
Please notice all the output files (.war, .ear and .jar) files are created at maven local repository (USERLOCAL/.m2\repository\org\mycompany).
Have fun.
Tuesday, March 9, 2010
Unable to find javac compiler while running Ant from Maven2.
If your maven2 pom.xml is using a plugin (maven-antrun-plugin) to run ANT build.xml and a javac task is used in it to compile source then it is very usual to get the following error.
Reason: An Ant BuildException has occured: The following error occurred while executing this line:
C:\maventest\build.xml:79: Unable to find a javac compiler;
com.sun.tools.javac.Main is not on the classpath.
Perhaps JAVA_HOME does not point to the JDK.
It is currently set to ..***\***\jre.
Cause: When Maven2 runs pom.xml it uses the jre (%JAVA_HOME%\jre) instead of %JAVA_HOME% and when ant build is using 'javac' task then maven2 tries to find javac in %JAVA_HOME%\jre.
Solution: Any of the following three can be used. Solution 1 is prefered.
1. Provide a property in pom.xml for maven-antrun-plugin to fork/use javac as an external process. Please see image for reference
2. In pom.xml for maven-compiler-plugin add a property to fork out the javac process.
Read more about the properties of this plugin at http://maven.apache.org/maven-1.x/plugins/java/properties.html
<properties>
<maven.compile.fork>true</maven.compile.fork>
<properties>
either under element or under of maven-compiler-plugin.
3. In ant build.xml at javac task use an attribue fork='true'
Reason: An Ant BuildException has occured: The following error occurred while executing this line:
C:\maventest\build.xml:79: Unable to find a javac compiler;
com.sun.tools.javac.Main is not on the classpath.
Perhaps JAVA_HOME does not point to the JDK.
It is currently set to ..***\***\jre.
Cause: When Maven2 runs pom.xml it uses the jre (%JAVA_HOME%\jre) instead of %JAVA_HOME% and when ant build is using 'javac' task then maven2 tries to find javac in %JAVA_HOME%\jre.
Solution: Any of the following three can be used. Solution 1 is prefered.
1. Provide a property in pom.xml for maven-antrun-plugin to fork/use javac as an external process. Please see image for reference
2. In pom.xml for maven-compiler-plugin add a property to fork out the javac process.
Read more about the properties of this plugin at http://maven.apache.org/maven-1.x/plugins/java/properties.html
<properties>
<maven.compile.fork>true</maven.compile.fork>
<properties>
either under
3. In ant build.xml at javac task use an attribue fork='true'
Wednesday, October 14, 2009
Web service client (J2EE App) accessing Web Service over Https or SSL
I've recently encountered a situation where a J2EE application needs to access web service that is available on https (SSL). I've realized that accessing the web service over https and http are not alike, specifically when certificate comes in between.
In a usual scenario when a user access the secured site (https://******) in browser the server supplies the certificate to browser and when user agrees to the certificate as reliable/trusted communication, the certificate gets stored in browser. By agreeing the above step the browser assumes the subsequent communication is trusted with server, and does not request user to agree to certificate for every communication.
By analyzing the above handshake, having a java program to authorize/authenticate the communication each time when service is contacted is painful. Since J2ee application (WS client) is running in J2EE server, a smart decision is to let the trusted relationship is established between J2EE Server and Web Service. This allows any application that runs in J2EE Server can access Web Service over Https.
To achieve above I've done following things.
1. Accessed the service on https from browser and opened the certificate (see lock icon in below image.
I did not mind about the validity of response, my intention was to obtain the certificate.
2. Copied (Copy to File) the certificate into a file (xyz.cer) into a directory
Please see the below images. I've used IE6.x browser. The importing/copying of .cer file may be different in different browsers.


3. Uploading/Exporting the .cer file to the J2EE Server Security.
In my case I'm deploying the J2EE application (WS client) is deployed into Websphere Server 6.0.2 (WAS), I need to know what JKS file the WAS is using for SSL communication.
a. Finding JKS file that server is using.
Login to WAS with administration account.
OR
Start the 'Admin console' from context menu of WAS server instance from IDE (Eclipse/IRAD/WSAD).

Navigate to SSL > SSL configuration repertoires >/DefaultSSLSettings
and note down the value (${USER_INSTALL_ROOT}/etc/DummyServerTrustFile.jks) of 'Trust file name'. In your case 'Trust file name' value may be different.
Note: The image is conveying wrong and needs to be corrected.

Now export the cert file into ${USER_INSTALL_ROOT}/etc/DummyServerTrustFile.jks using KeyMan tool.
Navigate to the location keyman tool (C:\Program Files\IBM\Rational\SDP\6.0\runtimes\base_v6\bin\ikeyman.bat) and double click on it to see the application running. See the below image for reference. If ikeyman.bat does not run then run ikeyman_old.bat.

Click on 'Key Database File' > 'New' from Menu to locate the JKS file is configured to use the server. See below images for reference.


The DummyServerTrustFile.jks is located in the profile (C:\Program Files\IBM\Rational\SDP\6.0\runtimes\base_v6\profiles\default\etc\) that I'm using.
Save/Overwrite the file with changes. Enter the default password WebAS

Add xyz.cer to this (DummerServerTrustFile.jks) truststore.

Give a Label name to recoginze the certificate (xyz.cer) in Truststore (DummyServerTrustFile.jks)

Save the Label and see it in 'Key Database Content' pane. Exit from Keyman tool.

4. Restart the Websphere Application Server for changes to Trusted Store is effective.
5. If you have recieved wsdl file either through UDDI or Registery Explorer, generate client stubs and JAR them.
NOTE: IRAD6.0.2 has provided me different (Apache Axis 1.0, IBM SOAP and IBM WebSphere) Web service runtimes and each of them has one or the other problems .
a. Apache Axis 1.0 - java.lang.NoClassDefFoundError: sun/security/provider/Sun
b. IBM WebSphere - Communication was established with WS* only the initial or first time and could not reestablish for subsequent requests. In some occasions WAS was restarted. The error (Server Response Read is Failed) was observed for every request.
I've preferred Apache Axis 1.1 or later runtime.
The internet search on runtime problems provided me the following suggestion
There might be a reference in axis1.0 classes to the sun security class - which ignores any dynamically set classes in non SUN JDK environments.
6. Use Stubs in your J2EE application. See the example below
ExternalServiceLocator locator = new ExternalServiceLocator();
ExternalService extService= locator.getExternalService();
OR
ExternalService extService= locator.getExternalService(new URL ("https://example.external.service.com"));
String result = extService.getOperation1();
7. I've not run into any problems while running WS Client.
I've not used any of following security System properties settings in code or in server. If you run into problems try setting the following properties at WAS-JVM level ( Application servers > server1 > Process Definition > Java Virtual Machine > Custom Properties )
OR
at WS-Client code before accessing WS in Step 6
String fileName = "your jks file with absolute path";
String passwd = "your jks file password"; //Default is 'WebAS' for IBM WebSphere
System.setProperty("javax.net.ssl.trustStore", fileName);
System.setProperty("javax.net.ssl.trustStorePassword", passwd);
System.setProperty("javax.net.ssl.keyStore", fileName);
System.setProperty("javax.net.ssl.keyStorePassword", passwd);
If proxy server authentication is required for WS Client, then additionally configure the HTTP or HTTPS proxyUser and proxyPassword transport properties using one of the methods specified.
To access the Web Proxy over HTTP
System.setProperty("http.proxyHost", "YOUR_PROXY_SERVER_NAME");
System.setProperty("http.proxyPort", "YOUR_PROXY_SERVER_PORT");
System.setProperty("http.proxyUser","PROXY_USER_NAME");
System.setProperty("http.proxyPassword","PROXY_USER_PWD");
To access the Web Proxy over HTTPS
System.setProperty("https.proxyHost", "YOUR_PROXY_SERVER_NAME");
System.setProperty("https.proxyPort", "YOUR_PROXY_SERVER_PORT");
System.setProperty("https.proxyUser","PROXY_USER_NAME");
System.setProperty("https.proxyPassword","PROXY_USER_PWD");
NOTE: If you are accessing the https service from corporate environment make sure your Application Server can establish the connection with Web Service. In my experience my Webpsphere server was restricted from accessing the external Web Service so I had disconnected the server from corporate network and connected to internet over Wireless, was able to access the Web Service.
You may run into some proxy related issues, please correct them before you conclude that your client is able to access WS*.
In a usual scenario when a user access the secured site (https://******) in browser the server supplies the certificate to browser and when user agrees to the certificate as reliable/trusted communication, the certificate gets stored in browser. By agreeing the above step the browser assumes the subsequent communication is trusted with server, and does not request user to agree to certificate for every communication.
By analyzing the above handshake, having a java program to authorize/authenticate the communication each time when service is contacted is painful. Since J2ee application (WS client) is running in J2EE server, a smart decision is to let the trusted relationship is established between J2EE Server and Web Service. This allows any application that runs in J2EE Server can access Web Service over Https.
To achieve above I've done following things.
1. Accessed the service on https from browser and opened the certificate (see lock icon in below image.
I did not mind about the validity of response, my intention was to obtain the certificate.
2. Copied (Copy to File) the certificate into a file (xyz.cer) into a directory
Please see the below images. I've used IE6.x browser. The importing/copying of .cer file may be different in different browsers.


3. Uploading/Exporting the .cer file to the J2EE Server Security.
In my case I'm deploying the J2EE application (WS client) is deployed into Websphere Server 6.0.2 (WAS), I need to know what JKS file the WAS is using for SSL communication.
a. Finding JKS file that server is using.
Login to WAS with administration account.
OR
Start the 'Admin console' from context menu of WAS server instance from IDE (Eclipse/IRAD/WSAD).

Navigate to SSL > SSL configuration repertoires >
and note down the value (${USER_INSTALL_ROOT}/etc/DummyServerTrustFile.jks) of 'Trust file name'. In your case 'Trust file name' value may be different.

Now export the cert file into ${USER_INSTALL_ROOT}/etc/DummyServerTrustFile.jks using KeyMan tool.
Navigate to the location keyman tool (C:\Program Files\IBM\Rational\SDP\6.0\runtimes\base_v6\bin\ikeyman.bat) and double click on it to see the application running. See the below image for reference. If ikeyman.bat does not run then run ikeyman_old.bat.

Click on 'Key Database File' > 'New' from Menu to locate the JKS file is configured to use the server. See below images for reference.


The DummyServerTrustFile.jks is located in the profile (C:\Program Files\IBM\Rational\SDP\6.0\runtimes\base_v6\profiles\default\etc\) that I'm using.
Save/Overwrite the file with changes. Enter the default password WebAS

Add xyz.cer to this (DummerServerTrustFile.jks) truststore.

Give a Label name to recoginze the certificate (xyz.cer) in Truststore (DummyServerTrustFile.jks)

Save the Label and see it in 'Key Database Content' pane. Exit from Keyman tool.

4. Restart the Websphere Application Server for changes to Trusted Store is effective.
5. If you have recieved wsdl file either through UDDI or Registery Explorer, generate client stubs and JAR them.
NOTE: IRAD6.0.2 has provided me different (Apache Axis 1.0, IBM SOAP and IBM WebSphere) Web service runtimes and each of them has one or the other problems .
a. Apache Axis 1.0 - java.lang.NoClassDefFoundError: sun/security/provider/Sun
b. IBM WebSphere - Communication was established with WS* only the initial or first time and could not reestablish for subsequent requests. In some occasions WAS was restarted. The error (Server Response Read is Failed) was observed for every request.
I've preferred Apache Axis 1.1 or later runtime.
There might be a reference in axis1.0 classes to the sun security class - which ignores any dynamically set classes in non SUN JDK environments.
6. Use Stubs in your J2EE application. See the example below
ExternalServiceLocator locator = new ExternalServiceLocator();
ExternalService extService= locator.getExternalService();
OR
ExternalService extService= locator.getExternalService(new URL ("https://example.external.service.com"));
String result = extService.getOperation1();
7. I've not run into any problems while running WS Client.
I've not used any of following security System properties settings in code or in server. If you run into problems try setting the following properties at WAS-JVM level ( Application servers > server1 > Process Definition > Java Virtual Machine > Custom Properties )
String passwd = "your jks file password"; //Default is 'WebAS' for IBM WebSphere
System.setProperty("javax.net.ssl.trustStore", fileName);
System.setProperty("javax.net.ssl.trustStorePassword", passwd);
System.setProperty("javax.net.ssl.keyStore", fileName);
System.setProperty("javax.net.ssl.keyStorePassword", passwd);
If proxy server authentication is required for WS Client, then additionally configure the HTTP or HTTPS proxyUser and proxyPassword transport properties using one of the methods specified.
To access the Web Proxy over HTTP
System.setProperty("http.proxyHost", "YOUR_PROXY_SERVER_NAME");
System.setProperty("http.proxyPort", "YOUR_PROXY_SERVER_PORT");
System.setProperty("http.proxyUser","PROXY_USER_NAME");
System.setProperty("http.proxyPassword","PROXY_USER_PWD");
To access the Web Proxy over HTTPS
System.setProperty("https.proxyHost", "YOUR_PROXY_SERVER_NAME");
System.setProperty("https.proxyPort", "YOUR_PROXY_SERVER_PORT");
System.setProperty("https.proxyUser","PROXY_USER_NAME");
System.setProperty("https.proxyPassword","PROXY_USER_PWD");
NOTE: If you are accessing the https service from corporate environment make sure your Application Server can establish the connection with Web Service. In my experience my Webpsphere server was restricted from accessing the external Web Service so I had disconnected the server from corporate network and connected to internet over Wireless, was able to access the Web Service.
Subscribe to:
Posts (Atom)


